Using Active Choices with Role Strategy Plug-in
Having worked in Open Source for a few years, one of my favorite things is when you can share experience with other people that you meet. Andrew Gray has worked with .NET and Jenkins for years, and we met through Open Source. He has helped me in the past with Jenkins and .NET, and also maintains the blog Jenkins.NET.
A couple of days ago he sent me an interesting question. He asked me if that would be possible to use Active Choices Plug-in with the Role Strategy Plug-in. This plug-in lets you define roles, define which permissions a role has, and then assign users to the roles.
The idea was to show a set of parameters that would vary according to the user roles. So, say that the user is a tester. Then s/he would see certain parameters. But if s/he was a manager, other parameters would be displayed.
To the code
import hudson.model.User
import hudson.model.Hudson
import hudson.security.AuthorizationStrategy
import hudson.security.Permission
import com.michelin.cio.hudson.plugins.rolestrategy.RoleBasedAuthorizationStrategy
import com.michelin.cio.hudson.plugins.rolestrategy.RoleMap

AuthorizationStrategy strategy = Hudson.getInstance().getAuthorizationStrategy();

jobs = []
user = User.current()
userId = user.getId()

if (strategy != null && strategy instanceof com.michelin.cio.hudson.plugins.rolestrategy.RoleBasedAuthorizationStrategy) {
    roleStrategy = (RoleBasedAuthorizationStrategy) strategy;
    // not very straightforward to get the groups for a given user
    roles = roleStrategy.getGrantedRoles("globalRoles")
    for (entry in roles) {
        role = entry.key
        users = entry.value
        if (role.getName().equals("tester")) {
            if (userId in users) {
                jobs = ["PROJECT_FOR_TESTERS1", "PROJECT_FOR_TESTERS2"]
                break
            }
        } else if (role.getName().equals("admin")) {
            if (userId in users) {
                jobs = ["PROJECT_FOR_ADMINS1", "PROJECT_FOR_ADMINS2"]
                break
            }
        }
    }
}

return jobs
// TODO: handle anonymous user ;-)
And now let’s dissect the code.
import hudson.model.User
import hudson.model.Hudson
import hudson.security.AuthorizationStrategy
import hudson.security.Permission
import com.michelin.cio.hudson.plugins.rolestrategy.RoleBasedAuthorizationStrategy
import com.michelin.cio.hudson.plugins.rolestrategy.RoleMap
You start by importing the classes that you need.
AuthorizationStrategy strategy = Hudson.getInstance().getAuthorizationStrategy();

jobs = []
user = User.current()
userId = user.getId()
The first line gets the current AuthorizationStrategy used in Jenkins.
Then we create an empty array of jobs, which is the value returned by default. And get the current logged in user ID.
if (strategy != null && strategy instanceof com.michelin.cio.hudson.plugins.rolestrategy.RoleBasedAuthorizationStrategy) {
    roleStrategy = (RoleBasedAuthorizationStrategy) strategy;
    // not very straightforward to get the groups for a given user
    roles = roleStrategy.getGrantedRoles("globalRoles")
    for (entry in roles) {
        role = entry.key
        users = entry.value
        if (role.getName().equals("tester")) {
            if (userId in users) {
                jobs = ["PROJECT_FOR_TESTERS1", "PROJECT_FOR_TESTERS2"]
                break
            }
        } else if (role.getName().equals("admin")) {
            if (userId in users) {
                jobs = ["PROJECT_FOR_ADMINS1", "PROJECT_FOR_ADMINS2"]
                break
            }
        }
    }
}

return jobs
// TODO: handle anonymous user ;-)
The final part simply iterates through each existing role, and then through the users in that role. I could not find a more elegant way of doing that, but in case you would like to maybe optimize the code, here are the main classes that I used from Jenkins to write the script.
Normally I either use my local working copy of Jenkins project imported in Eclipse, or use the “Find File” feature in GitHub. Then remember a little bit about Jenkins Java API to walk through the classes and write the Groovy code (I made a video about writing Groovy with Auto Complete in Eclipse, but that’s in Portuguese only).
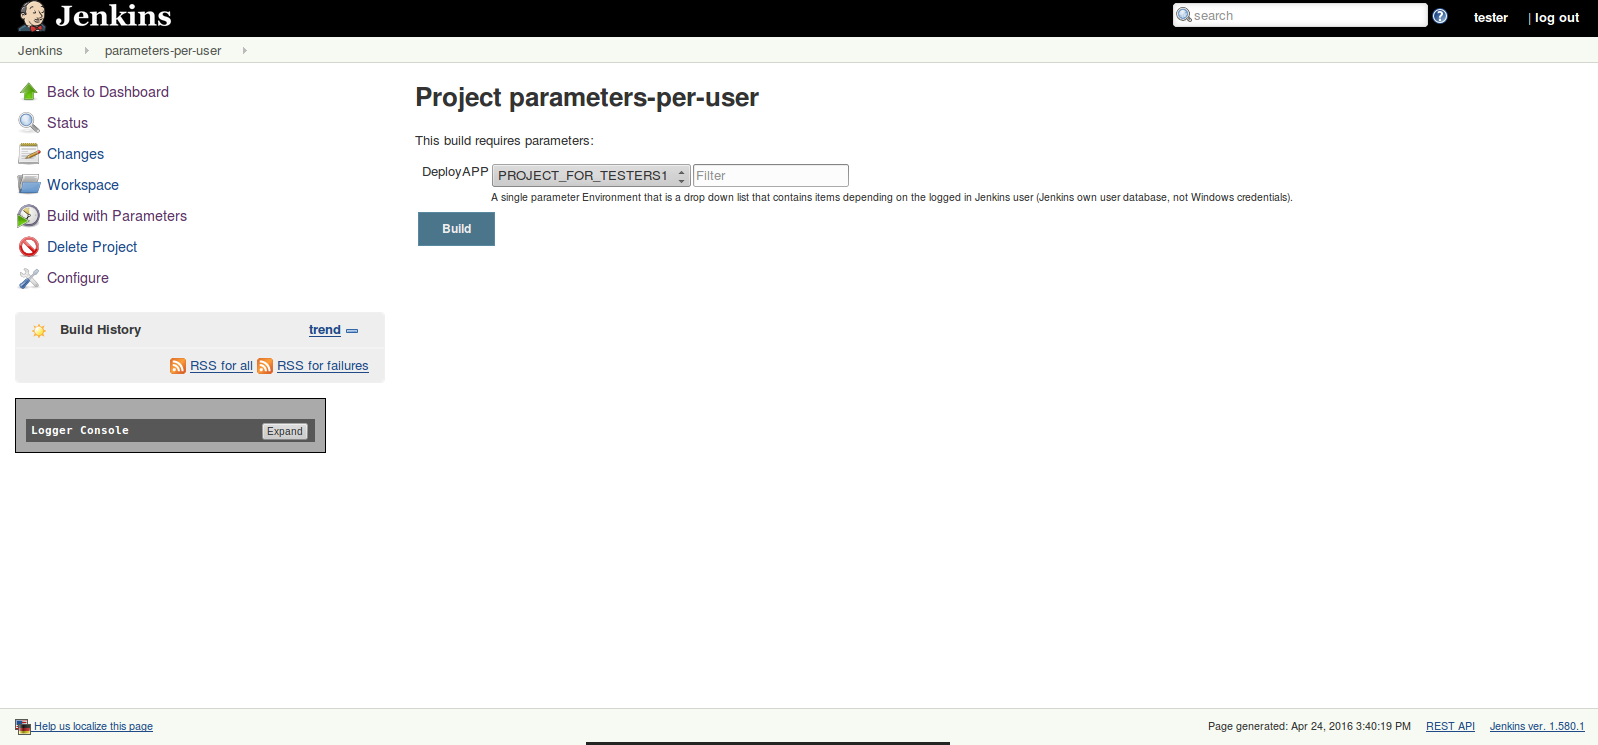
What the result looks like in Jenkins
In this section we have just simple screenshots, showing the script in the job configuration.

And the resulting screen. The parameter DeployAPP will be available during the build, and can be used to trigger other jobs or pipelines.
Where can you find this script?
This blog post has a copy of the script, but I have also submitted a pull request to a repository maintained by another friend, Ioannis Moutsatsos. Ioannis maintains a Jenkins installation in Novartis, and is probably the most skillful user of the Active Choices Plug-in.
Another advantage of this other copy, is that it may be updated with time, in case there are bugs or improvements. So watch Ioannis’ repository for updates!
ps: I’ve also met Ioannis through Open Source code, and have learned a lot by working with him.
♥ Open Source!
Categories: Blog
Tags: Jenkins